Swarming season

It’s swarming season for honeybees. It is their natural method of expanding colonies and May is the perfect time for them to do it. A swarm now will have enough time to establish a new home and build up stores for the winter.

The downside is that swarms in towns and cities are unwanted and often pick inconvenient places for their new home. This is where beekeepers around the country come in. We operate a swarm collecting service and last night was my turn to go collect.

honeybee swarm collectingSome swarms can be in the most difficult of places to reach, I heard of one last week between the roof lining of a church, some 30ft up.

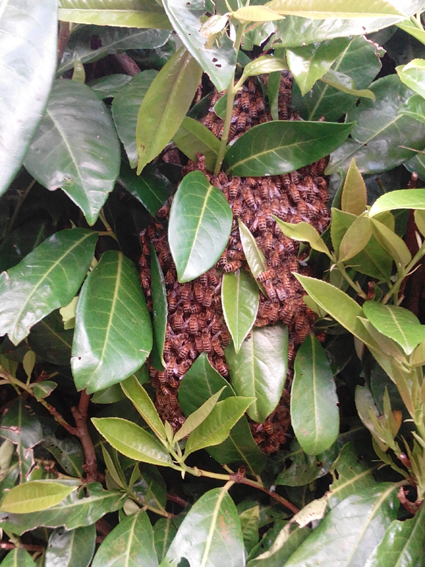
The swarm I was called out to last night was at the other end of the scale, hanging 4ft off the ground in a laurel bush next to a driveway.

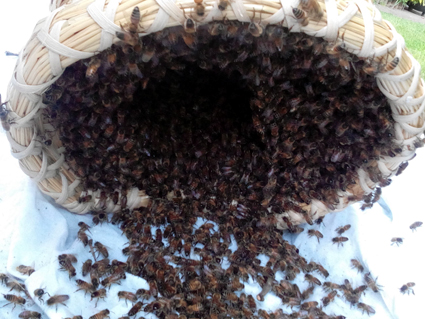
There are about 10,000 bees here, a medium sized swarm. They are at their most docile, full of honey and only interested in establishing a new home.

Problems come when animals brush by or small children poke them with a stick.


honeybee_swarm_collecting_2There is nothing scientific about the process of removal. The key is to get the queen and the others will follow.

I held my skep under the swarm and then gave the branch a sharp knock. If you just shake then the bees will instinctively hang on.

The bulk of the bees simply drop into the skep. Then all you need to do is turn the skep over onto a sheet and leave for a few minutes for the bees to settle.


honeybee_swarm_collecting_3
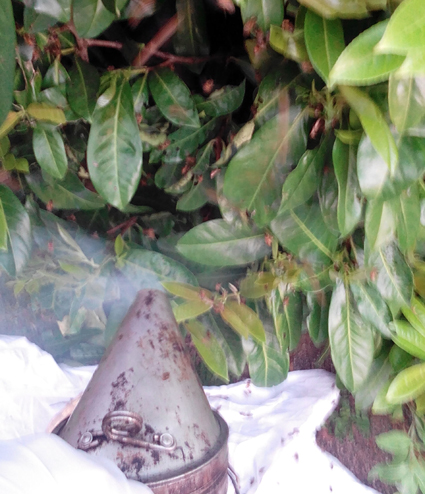
Some bees will instinctively return to the branch. This isn’t usually a problem as, without a queen, they will ultimately drift away. However, as this swarm was outside a house I wanted to make sure I had cleared as many bees as possible, so that there was no risk of anyone being stung. I used smoke to push the bees away from the branch, disguising the remnants of the queen’s smell and driving them down to the rest of the colony.

After about 30 minutes, by which time the bees have settled into the skep, it is wrapped in the blanket and taken away.


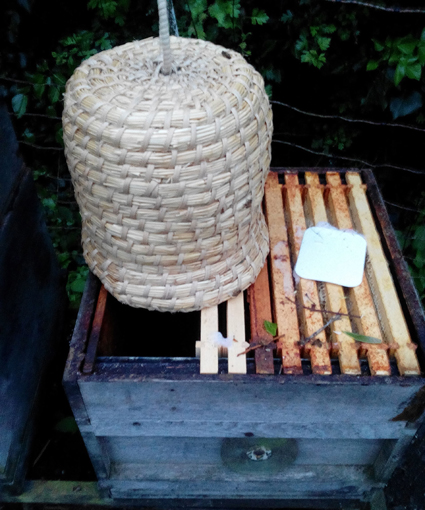
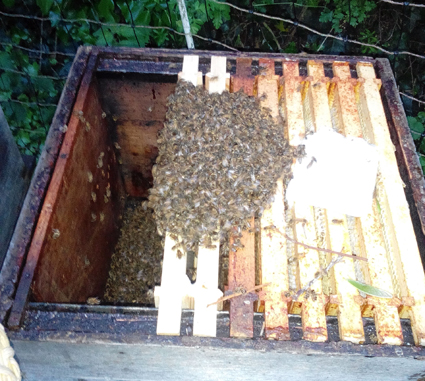
This is only half the story, as they now need rehousing.

Below you can see the bees hanging inside the skep, it is pretty full. A hive is then prepared, with some new and some old frames, and the skep placed over it. Finally another sharp knock on the skep and the bees fall into their new home.

I will now leave them alone for a couple of days to settle down before taking another look at them.

honeybee_swarm_collecting_4

honeybee_swarm_collecting_5honeybee_swarm_collecting_6


Glass casting part 4: oh yes

It has been an adventure, a learning process, but it is done, the cast glass foot is finished.

fused glass foot

You last saw the mould full of glowing molten glass in the kiln. The mould cracked in the kiln, which has resulted in the ‘fin’ you can see across the middle of the foot. This can easily be ground off, so no major problem there.

Luckily the mould held together well enough to keep the glass in, but, as you can see below, it quite literally fell apart after being taken out of the kiln, allowing the foot to be removed easily.

foot 3

fused glass foot 2


All in all I am very pleased with the result. The detail is amazing, every line and ‘toe print’ is visible. The next phase it to built it into a sculpture. I am still not sure how to do that, so it might be a while before we revisit this one.

Glass casting part 3: don’t panic

I thought I owed an update on the glass casting. Well, it all got a little bit worrying. The first night of firing we were woken by a strong smell. Investigations proved the source to be the kiln, which, in its mould drying phase, was filling the studio with smelly steam.  This definitely wasn’t part of the plan, so we switched off the kiln and left it to cool. In the morning we opened the kiln to find one mould cracked and a nasty brown tinge to the kiln.

IMG_20160507_103320_1IMG_20160507_103314_1Fearing the worst, I contacted Kilncare, to find that this was actually perfectly normal. I perhaps needed to slow the drying phase to prevent cracks. Apart from that the brown stain was caused by the water, which would burn off. Panic over, reset process.


For the second attempt I decided not to use the already cracked mould, so the ‘gold bar’ will have to wait for another day. The foot went back in and, with a slow ramp up, appeared to melt well. The picture below is of us taking a quick peek at the 880 degrees C melting phase. The wire in the picture is being used to pop a couple of bubbles in the molten glass.

fused foot melting


The foot is now in its long cooling down phase. This takes about 4 days to prevent cracking of the glass.


Glass casting: part 2, going in

It is a while since I wrote about my first move into glass casting. Having frightened myself working out just how long (for that read expensive) the kiln cycle is for casting glass, I decided to fill the space with a couple of extra castings.

casting glassThe process of making the moulds was exactly the same as with the foot, except of course these moulds didn’t wriggle.

The first is an ammonite. I made one from metal a while ago on the forge and decided that I would like to make a glass one too.

The second casting takes a little more explaining. It is a ‘gold bar’. Using the forge as a heat source to melt lead, I decided it would be fun to cast a mock gold bar using some lead left over from the roof flashings for our extension (that was 10 years ago now). After that I cast one from aluminium too, as I liked the idea of the painted bars looking identical, but providing a surprise when picked up. The glass bar adds another material to the set. I’ll show you all 3 later.

I have used clear glass for the foot and ammonite and a golden tint glass for the gold bar, for obvious reasons. The picture here shows the rough glass ingots in the moulds. To calculate the amount of glass needed you first pour water into the mould, for the foot this was 625ml. then multiply by the specific gravity of glass (2.5), giving 1.5kg of glass.

With the kiln at maximum temperature, the glass should then melt down into the mould, filling it perfectly to the top. The (next) tricky bit comes in calculating the time to anneal the glass after melting. In this case it is 4 days of reducing the heat by 2 degrees an hour. Even then I am told that the stresses can easily cause cracks.

I am a little nervous about this one, partly because of the time it has taken to prepare the moulds, and partly because I have a feeling I know what the electricity bill will be for 5 days of kiln firing. if it works then that is all OK, if it doesn’t…Wish me luck.